Hex Editing for Archivists (Part 2)
How to Read & Edit Binary Data
Table of contents
Abstract
In the previous part, we've covered the basics of "what is hex?" and how to use a hex editor for binary files.
This part is about handling the data in the file itself, such as searching or editing text or reading and editing binary data with the use of a file format specification paper.
This article is mainly aimed at archivists with digital preservation needs, and maybe a bit for data forensic beginners.
There is also a PDF version of this document available for download, as well as its Markdown source code.
Handling text in binary files
Searching Text
As already mentioned, you'll encounter text phrases inside binary files. If you look at a lossy compressed audio file like MP3 or MP4, it's quite likely to contain descriptive metadata embedded. In order to read embedded metadata, you need to know at which byte offsets to find which data field and how to interpret it. If it's a number, you already know what to do, but if it's text you may find 2 different ways in which its displayed in the text column:
- Single-Byte encoding:
HELLO
- Multi-Byte encoding (e.g. UTF-8):
H.E.L.L.O.
Here's a bogus example how these 2 encodings would look in a hex editor:
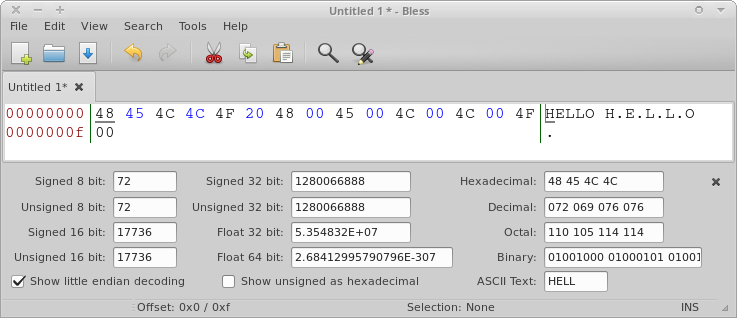
Single- and multi-byte character encoding of "hello" next to each other (separated by a space character "0x20")
The dots between the letters in Unicode are not to indicate an abbreviation, or some ASCII-Art: The dots represent non-printable characters. The 2nd byte of the multi-byte encoding. Thanks to downwards compatiblity with single-byte ASCII mapping, the basic alphanumeric characters are still readable in their 1-byte representation. Therefore the letters between the dots :)
Now, when searching for text inside a binary file, some editors allow to specify if you search for 1 or 2 byte encoded strings. If you see the text displayed with dots, use multi-byte encoding, otherwise single-byte.
Text strings inside a binary file often end with the hex character "0x00". Therefore they're called "null-terminated strings". The metadata fields inside a PNG for example, are separated by a 0x00 character. That's how you know where one term ends and another one begins.
Editing Text
The hex editor can be used to edit binary files. But let's start with editing text in binary files. Maybe I chose this, because that was the first thing I did with a hex editor when I was a kid: I changed text phrases in my favorite computer games. It was endless fun translating English to Austrian slang, and share this personalized version with friends :D
But when my father showed us this "hacker tool", he advised us:
"Stay within a string's boundaries. Always. Otherwise, bad things may - and probably will - happen to your file and to your system."
And he was right indeed:
If you change a text string in a binary file and you overwrite its end (=the 0x00 byte), you overwrite actual code. If it's an executable, it might crash when trying to read that string, or access the data that you deleted by replacing it with your text. When doing this to a media file, pixels might be ill-colored, or the whole image falls apart, or all colors are wrong - or the viewing application crashes.
So please: If you edit text strings, stay inside their boundaries. If you want to replace it with a shorter text, just add "space" characters to fill it up until its "null-terminated" end.
The File Header
Okay, now editing text was fun already, but imagine that you're actually going to manipulate binary data! O.O
Intentionally - and knowing what you're doing.
So here we go: First, you have to know about the so called "File Header". As the name suggests: It's data located at the beginning - the "head" - of a file, usually containing structural information about the payload data to come.
For example in a WAV file, as you can see in its specification, the header contains information like this:

WAVE file header (Source: http://soundfile.sapp.org/doc/WaveFormat/)
See the "RIFF" at the beginning of the header? Just like videofiles, WAV is (mostly) uncompressed PCM (=audiocodec) inside a "Resource Interchange File Format" (RIFF) container. (btw: Did you know, that it's technically legal - yet very uncommon - to store MP3-compressed data as audio-payload inside a RIFF container?)
The source page of this image, also contains good explanations of the general RIFF-container.
As you see, each data field has its defined position in the header block. Therefore, if you want to read any file it's necessary to have its file format specification. If not: you have to hack - aka "reverse engineer" - its layout. Quite tedious, and error-prone, yet possible. But why not use the front door?
For an incredibly awesome view of the WAV file specification as a graph see this piece of art (by Ange Albertini):

WAV101 walkthrough graph
In the header of a binary file, you'll always have the necessary information to interpret the contained data.
For example:
Audio file header
- Samplerate and bit-depth
- Number of channels
- Format information (PCM, MP3, etc.)
- Audio data offset (=payload)
- ...
Image file header
- Image resolution (width & height)
- Bit-depth
- Compression information
- ...
Reading a WAV file header
So, in the images and links from above we've seen which data is stored in a RIFF container. Let's find where to find the WAV information like audio resolution and channels, etc. inside a WAV.
Here's the hex editor view of the header part:

Annotated WAV header in hex
Reading the audio samplerate
And as you can see, I've put the editing cursor (red mark) at the offset of the samplerate. The hex value/data is: 0x80 BB 00 00
Let's convert this hex value to decimal - but: remember endianess?
If you read it from left-to-right (in the order the data bytes are displayed), its interpretation would be:
0x80 BB 00 00 = 2,15973888e9
That's viewing it as "Big Endian". In this case, that's not a valid samplerate...
Since we've selected "Show little endian encoding", the bytes are read from right-to-left, resulting in:
0x00 00 BB 80 = 48000
That's viewing it as "Little Endian". In this case, that's correct :).
Therefore, the value "48000" (=48 kHz) is displayed in the "unsigned 32 bit" data display field at the bottom. In case you wonder, why the value 48000 shows up in "signed 32 bit" as well as "unsigned 16 bit", the reasons are as follows:
Unsigned 16 bit:
This only works if the value is less-or-equal than 65535.
- Maximum value of 16 bit unsigned is: 65535
- 48000 is smaller than 65535
- So, reading just the first 2 bytes (=16 bit) is sufficient for representing the decimal value of 48000
Signed 32 bit:
- The first 2 bytes of this 4 byte value are: 0x00 00 = 0
- So, the "signedness" = 0 = unsigned
- Therefore the value of unsigned and signed interpretation are identical.
Reading format, channels and bits-per-sample
In the annoted WAV header image above, you will see the following hex values (I'm already writing them as little-endian for easier hex-to-decimal conversion):
- AudioFormat = 0x0001
- NumChannels = 0x0001
- BitsPerSample = 0x0010
Since all 3 fields start with 0, you only need to convert the 2nd value to get the decimal value:
- AudioFormat = 1
- NumChannels = 1
- BitsPerSample = 16
Channels and BitsPerSample are "what you see is what you get". So, a stereo file would have "NumChannels = 2". In order to interprete "AudioFormat", you need to look up the format index number in a table, according to specifications.
Here are some examples for this "AudioFormat" value:
- 0x0001 = PCM (linear)
- 0x0101 = IBM mu-law
- 0x0103 = IBM ADPCM (Adaptive Differential PCM)
- ...
PCM (uncompressed, linear) is the most common one.

MediaInfo view of Noise.WAV
Let's use MediaInfo to verify if we've interpreted the header bytes correctly. Looks good!
- Format "Wave" (=WAV)
- 48 kHz samplerate
- 16 bits
- 1 channel (mono)
- PCM (little endian / signed)
Modifying a WAV file header
The following methods can be applied to any value within the binary data - as long as you know which byte-offset to edit, and which values you want to use.
Fixing bit error in samplerate
Now what if you encounter a WAV file where the header data is corrupted? For example, a bit-flip in the samplerate bytes. Let's use the byte sequence we had for 48 kHz:
0x80 BB 00 00
Assuming that the "0xBB" byte was affected. Its correct binary value (=8 bits) is:
0xBB = 1011 1011
If a single bit of the "0xBB" byte was wrong, it could look like this:
1011 1001 => 0xB9
Rendering the samplerate as:
0x80 B9 00 00 = 47488 (instead of 48000)
Since 47488 is not a common samplerate, overwriting 0xB9 with 0xBB will bring the technical metadata of your WAV file back to correct values :)
Then simply save the file and voila!
Manually "resampling" an audiofile
Okay, maybe the headline of this paragraph is a bit bold ;P We're now going to change the value of the samplerate from any rate to 22050 Hz.
At the bottom of the image of the annotated WAV file header above, you see the position where the samplerate is stored in the data:
Offset: 0x18
Try to use the "Goto offset" option (if your hex editor has one) and enter the above value: "0x18" - or "24" if your editor locates in decimal.
You should now be on the field where the samplerate is set. In order to set this value to 22050 Hz, you must first "encode" this value (manually) to hex in the right endianess:
- 22050 (decimal) = 0x5622 (hex)
- samplerate's word size = 4 byte = 32 bit
- 0x5622 padded to 4 byte = 0x00 00 56 22
- Encoded in little endian: 0x22 56 00 00
So you must overwrite - not insert! - the following bytes at offset 0x18:
22 56 00 00
Then save the WAV file and check its file properties with MediaInfo, or listen to it: It should now play way slower than originally :D
Summary
Since you've already heard how to navigate in a binary file and read its bytes as numeric values in the first part of this tutorial, you're now able to smile at file format reference papers, because now their tech-gibberish-blah suddenly makes sense :) Hopefully.
If you encounter value errors in a file, you could now correct them manually (given of course, that you know the "correct" value to replace the broken data with). The manual resampling example shows you how to encode a decimal value to a hex sequence in the right endianess.
In the next part of this tutorial, We'll take a look at an image file format header, and see what happens if we change certain values... (That tutorial is still work in progress, though. Stay tuned!)
Here is a link to the previous, the first part of this tutorial: Hex Editing for Archivists (Part 1) - Basic Introduction
Have a great day! :D