User manual (Part 2)
Workflow Tasks
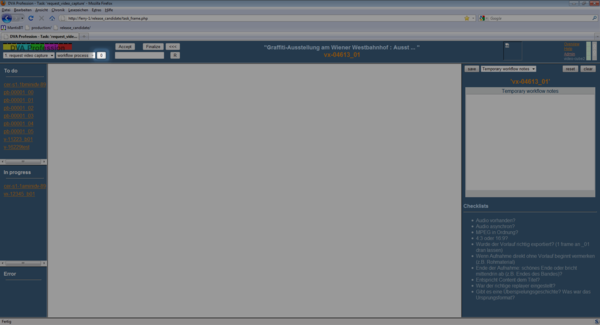
Task 1: request video capture
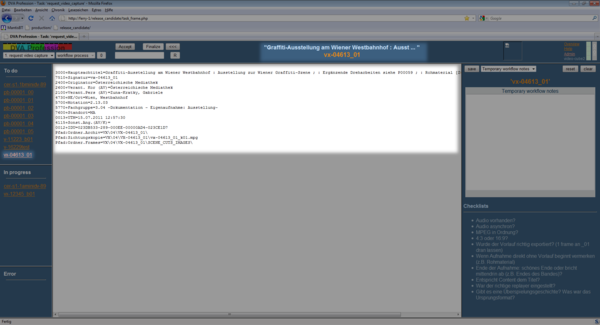
The digitization process starts with the task "request video capture". The task begins with the import of a textfile containing the signature of the video to be digitized and a selection of catalogue data or descriptive metadata (such as title, originator ...). If there are signatures (or more precise the related textfiles) in the import-inbox the number of them will be shown in the "capture-request-import"-button in the top frame (right to the "Action"-drop-down menu). Click on it and all the signatures (or textfiles) will be imported and show up in the "To Do"-status of the first task "request video capture". Now click on the signature of the video that you want to digitize followed by the "Accept"-button. The signature will leave the state "To Do" and move to "In progress". With the signature in this state you can process various "actions".
Import of capture requests
Before you start this task you need to import the waiting capture requests. Right to the "action"-drop-down menu you find the "custom action" button. When acting as the capture file import button, it will most often display the number "0" - meaning that there is no capture-request-textfile waiting to be imported in the system.
When there are capture-request-textfiles in the inbox this button shows the number of the files.

Click on this button and DVA-Profession will import the textfiles and therefore you will find the signatures of the videos that you wish to digitize in the task "request video capture" in the state "To Do".
Available Actions
In the first task "request video capture" there are three actions available: carrier, ghost handling and workflow process.
Carrier
The action "carrier" is available in the tasks "request video capture" and "check digitization". The purpose of this action is to input information regarding the physical video carrier.
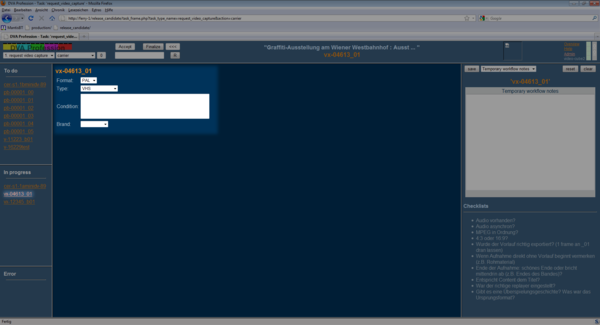
There are a number of form fields to fill in:
Format:
The first one is the "Format" where you can select "PAL".
Type:
Next would be "Type" where you can select the video format of the respective signature. There you can choose between: VHS, VCR, U-matic, Digital Betacam, DV and MiniDV. Depending on the type of video you have chosen there will be the corresponding brands of video tape manufacturers available.
Brand:
With the "Brand"-drop-down menu you can select the fitting one. Now the "Name"-drop-down menu appears.
Name:
Depending on the brand you have selected there will be a selection of "names" available. Those so called "names" represent the inscription on the video tape which usually indicates the length of the tape.
For example: When you have selected "VHS", "Sony" there will be the following selection of "names":
- E-90
- E-120
- E-180
- E-240
If you have selected "Digital Betacam", "Sony" you will find the following:
- BCT D40
- BCT D64L
- BCT D124L
Signal extras:
This is extra information about the video material and describes additional details about how the video signal is stored on the carrier, depending on the signal type.
Examples would be:- VHS: Longplay (LP) / Shortplay (SP)
- DV: HDV, DVCAM, DVCPRO50, ...
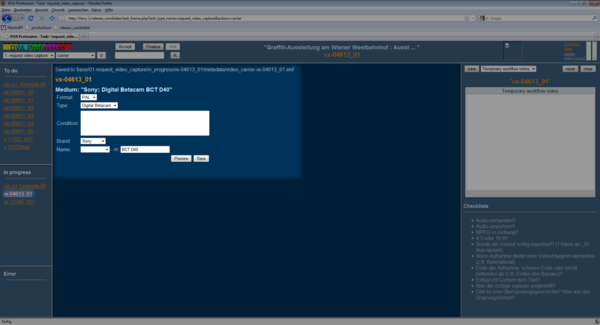
Example of entering a Digibeta as physical carrier medium.
The current selection of brands and corresponding names was initially populated during the digitization process of the "Österreichische Mediathek" and is still growing. It can be extended at all times by the user when new formats are encountered.
Ghost handling
The so called "ghost handling" is a way to manage a number of different video contents recorded on the same video tape. That way you can make seperate videos of the recordings originating from the same tape. For this purpose the different contents have different signatures and the regarding textfiles are imported seperately. Usually the first content on the tape serves as the "parent". This means that information that regards the whole tape only needs to be typed in once. For example, you want to digitize a video tape with two different contents which you need as two different videos in the end, you begin with the first content on the tape. Import the signature that belongs to the first content and accept it. Now you can type in all the carrier related data. Finalize this signature - it will serve as the parent of the depending second content (ghost). Now accept the related, second signature. Select the action "ghost handling". You will find a drop-down menu with all the signatures that are currently in the workflow. If the system is configured correctly, it will already select the possible "parent".
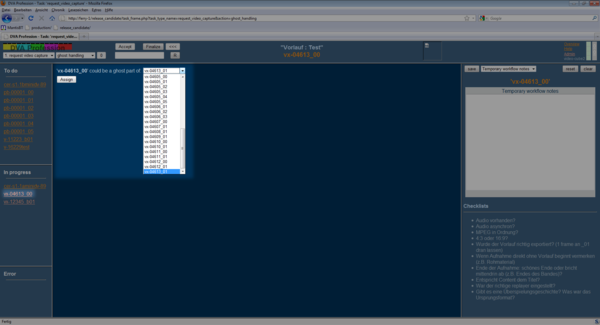
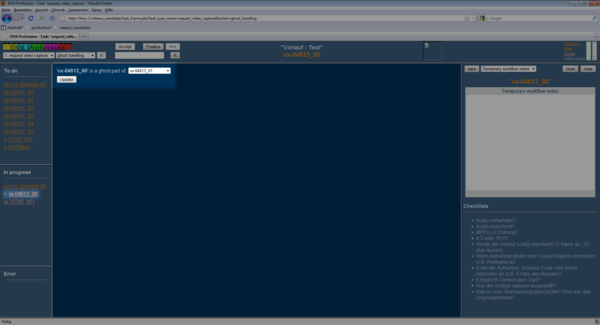
Click on the fitting one and "assign" the ghost (the signature of the second content) to its parent (the signature of the first content).
Select the action "carrier". You will find that the carrier data is already filled in because it has been taken from the parent.
One thing that you have to remember as an operator is the rule that a ghost cannot outrun its parent. So always accept the parent first and attend to the ghosts afterwards. This can also be important to keep in mind when you have to reset signatures. In that case you have to think in the reverse and first reset the ghosts or put them back to another task and then attend to the parent.
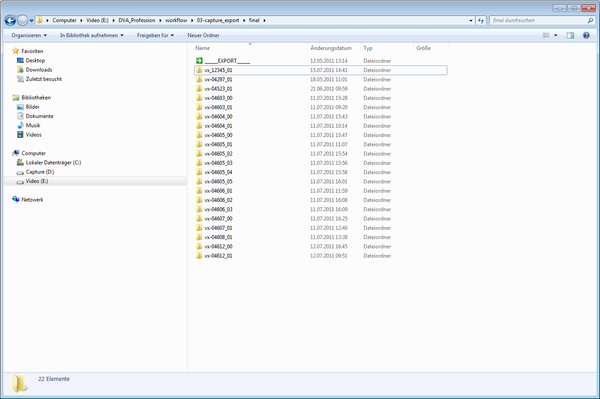
To illustrate the ghost handling we will give an example of how the "Österreichische Mediathek" uses this feature:
The video that we want to digitize consists of two different recordings. Additionally at the very beginning we have two minutes where a test picture is recorded. At the "Österreichische Mediathek" the digitized videos can be replayed by clicking on a link of the concerning catalogue entry. So the two different recordings on that tape are catalogued seperately and get different signatures. For example the first recording gets the signature "VX-12345_01" and the second one gets "VX-12345_02". In doing this the relation of the recordings to each other is put to record by using the same main signature (VX-12345) and then adding the number of the part of the recording (_01 or _02).
This way the whole video can be reconstructed as one if there is a need for it just by appending the following parts to the first. In order to make this possible it is a must for archival purposes to make sure that no frame of the video is left out in the export process. A reasonable way of conducting the segmentation of files belonging to one tape is to export the video segments so that the first frame of the second part consists of the last frame of the first part.
This way you can be sure that no video content between part one and part two is lost. Having for example a test picture at the beginning of a video can be annoying when replaying the first part. For that reason the "Österreichische Mediathek" treats the so called "forerun" as a part on its own using the main signature and the appendix "_00" (e.g. VX-12345_00).
The last frame of the test picture belongs to the segment of the "_01"-part as the first frame to ensure the consistency of the seperated parts. In the use of the "Österreichische Mediathek" the first part "_01" is the parent of ghost-signatures "_00", "_02" ... (if present). If there is a signature already in the workflow which resembles the signature that you want to appoint as a ghost it is suggested by this feature. In the drop-down menu the signature which is most likely the matching parent is pre-selected.
Workflow process
The action "workflow process" is designed for monitoring purposes. All the tasks that a signature has undergone are put on record with the according metadata and the operator can monitor and verify the correctness of the workflow processing in the action "workflow process".
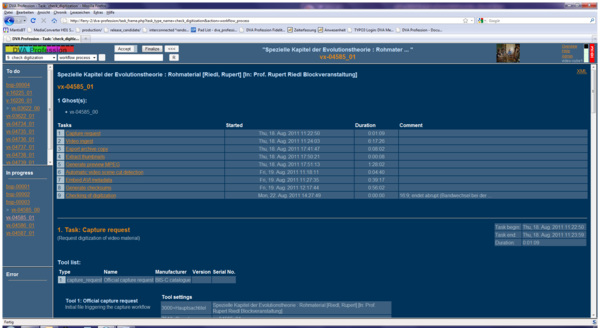
This action is the only one that is available in all tasks and the data it displays grows during the ongoing processing of a signature by every task that was executed on it.
Task 2: video capture
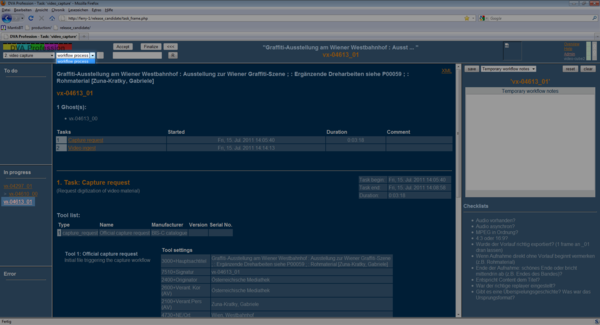
The second task in the workflow is "video capture". This is where the actual capture process takes place. After finalizing the selected signature in the first task it will show up in the state "To Do" of this task. Accept the signature of the video.
Remember that ghosts cannot outrun their parent. So always accept the parent first. By pressing the "Accept"-button, the destination folders for "video capture" and "capture export" for the current signature are created on the workstation that the signature is accepted on.
This way the workstation serves as a temporary storage of all the data produced during the workflow. The data will only be kept on the workstation from the moment of the "capture request" import to the finalization of the task "clean up". The only action available in this task is "Workflow process".
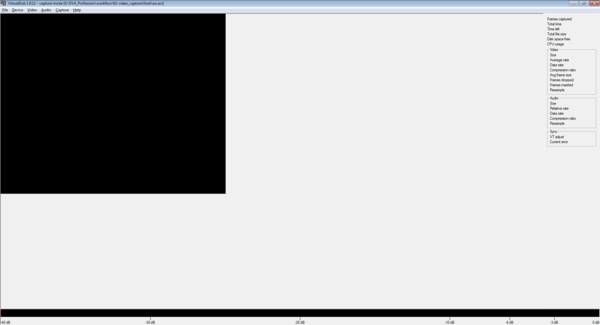
After accepting the signature you can start with the actual capture process and run your software for capturing (VirtualDub). Make sure that you select the right destination folder for capturing that is named with the signature of the video that you want to capture.
As soon as the first minute file of the exported video lands in the destination folder in "capture export" the signature will be finalized in the task "video capture" and be handed over to the state "To Do" in the next task "capture export".
Available actions
Workflow process
The action "workflow process" is designed for monitoring purposes. All the tasks that a signature has undergone are put on record with the according metadata and the operator can monitor and verify the correctness of the workflow processing in the action "workflow process". This action is the only one that is available in all tasks and the data it displays grows during the ongoing processing of a signature by every task that it has touched.
VirtualDub (capturing)
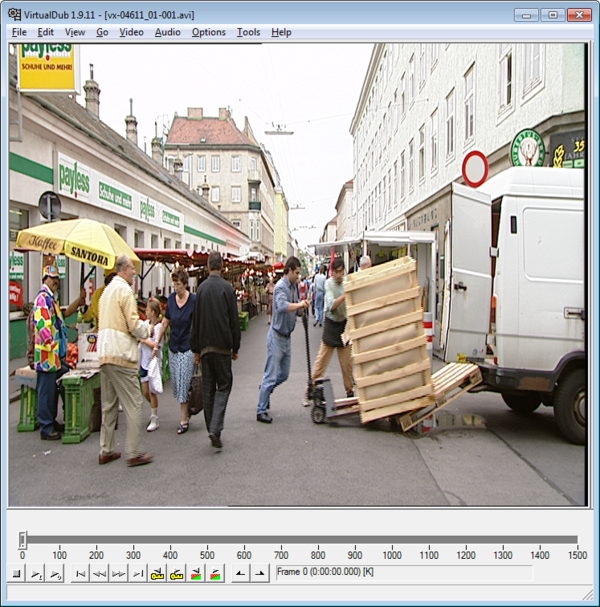
As capturing software it is recommended to use "VirtualDub". Experience has shown that it is a powerful capturing tool and the perfect fit for "DVA-Profession". VirtualDub is opened by clicking on the icon on the desktop. This way you make sure that it is opened using the specially developed script which loads the rightful settings for capturing. There are two different scripts a general one and the one for capturing DV. Right away after opening VirtualDub the capture modus starts with the correct settings so that an operator does not have to change anything in the configuration.
Pressing "F2" on your keyboard or clicking on "File" - "Set capture file..." a window opens up where you can select the destination of the video to be captured. For video capturing the window already shows the signature files on the capture disk. Open the folder named after the signature of the video that you want to capture.
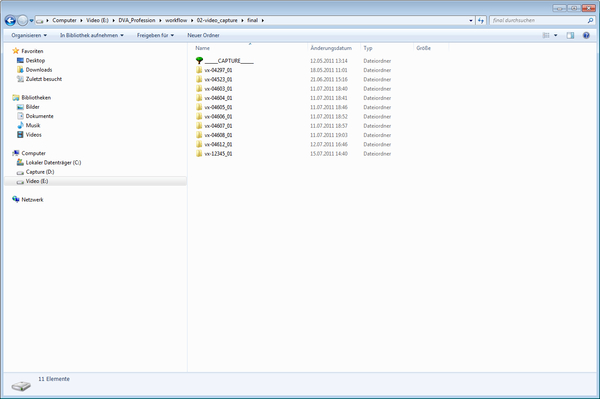
Inside the folder there is an already existing "dummy"-file. Select that file (e.g. double-click on it) as capture target, and if you are asked if you really want to replace this file, confirm it.

The purpose of the "dummy"-file is that an operator does not have to type in the correct name of the capture file. This way typing errors are avoided.
It can be quite usefull to activate the "large timer" before you start the capturing. This is done by clicking on "Capture" - "Display large timer". For monitoring the audio it is quite handy to activate the "Volume meter": click on "Audio" and then "Volume meter". Now you can start the capture process. Press "F5" or "F6" on your keyboard or click "Capture" - "Capture video". Start the replay of the video tape to be captured. When the replay of the video tape is finished press "Esc" or click on "Capture" - "Stop capture".
Task 3: capture export
"Capture export" is an automated task. As soon as one has accepted a signature in the video capture task, the ferry servers in the background are constantly monitoring the corresponding capture export folder. As soon as a video file appears in that output folder, the "capture export" task will automatically be set "in progress". After the contents of the capture export folder have not changed for some time, the task is considered to be finished - and will therefore automatically be finalized by the ferry server, too. This way, the operator does not have to "tell" the DVA-Profession system when the actual capture and export process are finished - regardless of the application used for performing those steps (capture & export).
Available actions
Workflow process
The action "workflow process" is designed for monitoring purposes. All the tasks that a signature has undergone are put on record with the according metadata and the operator can monitor and verify the correctness of the workflow processing in the action "workflow process".
This action is the only one that is available in all tasks and the data it displays grows during the ongoing processing of a signature by every task that it has touched.
Virtual Dub (export)
After the capture process is finished the capture file needs to be exported. To leave the capture mode of VirtualDub click on "File" - "Exit capture mode" and enter the "export mode".
Open the capture file that you want to export: "Strg" + "O" or click on "File" - "Open video file" and doubleclick on the folder with the desired signature. Doubleclick on the capture file.
Now you will see the input video pane which displays the original capture video. Using the timeline beneath the pane you can move within the capture file. Press the arrow keys (left, right) on your keyboard to move frame wise.
Now you need to mark the part of the capture file that you want to assign to a certain signature. Move using the timeline and the arrow keys to the first frame of the video to be exported. Press "Pos1" on your keyboard or click "Edit" - "Set selection start" to set the input marker. Now move to the frame after the last frame that you need to be part of the exported video. Press "End" or click "Edit" - "Set selection end" to set the output marker. Now the selection will appear blue in the timeline.
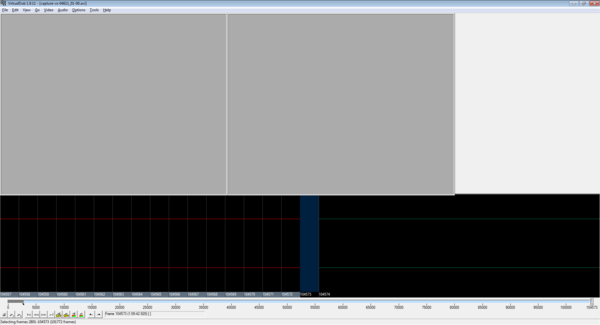
The next step is to select the destination of the video to be exported:
- Press "Shift + Ctrl + A" on your keyboard
- Or click:
- Edit
- Queue batch operation
- Save segmented avi (This will save the archive video file as minute segments)
Now the "final"-file of "video export" opens up. You just need to doubleclick on the folder named with the desired signature, then doubleclick on the "hires"-folder and click the "save"-button.
The export will not start right away ("Queue batch operation"). This is because after a whole day of capturing it is desired that the export process starts after you finished your workload of the day so that all the automated tasks following the export can be processed during the night.
You can do the selection (In/Out) and assigning of the destination folder either at the end of the day or in between capturing. Before you go, close VirtualDub and a window will open up saying "Press any key to start joblist...".
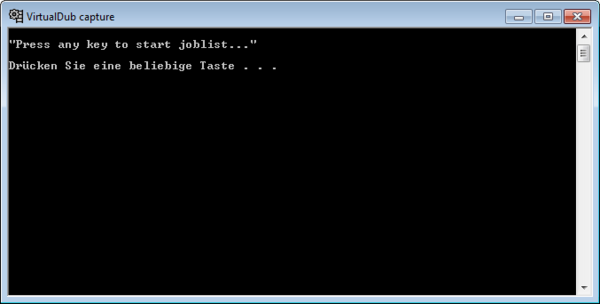
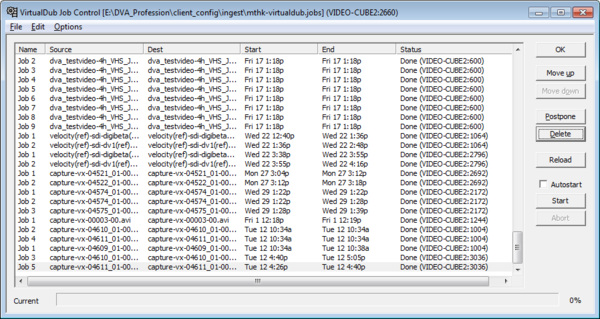
Do it and the export process will start working its way through the listed jobs. The joblist is also accessible by clicking "F4" on your keyboard or clicking "File" - "Job control".
Task 4: generate thumbnails
This is an automated task.
During this task the preview images used in the action "minute view" of the task "check digitization" are created. Each output image is exactly the first frame of every minute of the processed video.
Task 5: generate preview
This is an automated task.
This task creates the viewing copy which is a lossy MPEG-2-copy of the archive file. It is encoded directly from the actual archive video files in order to get a "what you see is what you get" copy. It is not segmented in minute parts and by default configured to be encoded as MPEG conforming to PAL-DVD standards with all properties set so it can directly be used for creating a video-DVD, without any changes necessary.
Task 6: scene cut detection
This is an automated task.
This task is designed to detect scene cuts in the video file, create "scene cut"-images (first frame of the new scene after a cut) , as well as generate so called "analysis graphs", used later on in the "check digitization" task. Currently, the engine used for doing this is based on a tool called "Shotdetect" by Johan Mathe (http://shotdetect.nonutc.fr/), which we are not only using, but also actively contributing improvements and patches to.
Task 7: embed (avi) metadata
This is an automated task.
This task's purpose is to embed certain metadata directly in the header of the AVI container file. As AVI metadata fields are originating and based on EXIF specifications, the fields we currently store are:
IARL (Archive Location) Archive signature
ICRD (Creation date) Digitization date As all date/time values throughout the DVA-Profession system, this value is also formatted according to the ISO8601 standard.
ITCH (Technician) Creator of the digital file. This string is taken from the variable name "ORIGINATOR_NAME" in "config.inc.php" and should be adjusted accordingly during setup of a DVA-Profession installation.
IPRT (Track) Used to store information about which minute segment it is. Example: 3 / 45 (Minute 3 of a 45 Minute recording)
In case you'd like to know more about the possible metadata fields that can be stored in an AVI container, you can consult the Exif specification: On page 90 (pdf-page: 96) of the Exif 2.2 specification paper (http://www.exif.org/Exif2-2.PDF), Table 29 "INFO List Chunks", shows 23 so called "Channel ID" names, with a short description.
Task 8: generate checksums
This is an automated task.
During this task mathematical checksums of the video files are generated in order to be able to perform integrity checks and be prepared for format migrations in the future. The current checksum algorithm used is "MD5", but can theoretically be changed to any hashing algorithm supported by PHP. The checksum type used can be configured as "CHECKSUM_TYPE" in "config.inc.php".
Task 9: check digitization
This is a manual task.
Before finalizing a signature take a look at the "Disk space control" to see if the storage is mounted and that there is still enough disk space left.
Available actions
Carrier
The action "carrier" is available in the tasks "request video capture" and "check digitization". The purpose of this action is to input information regarding the physical video carrier.
For details on the form fields you can fill in, please see the documentation for:
- Task: "Request video capture"
- Action: Carrier
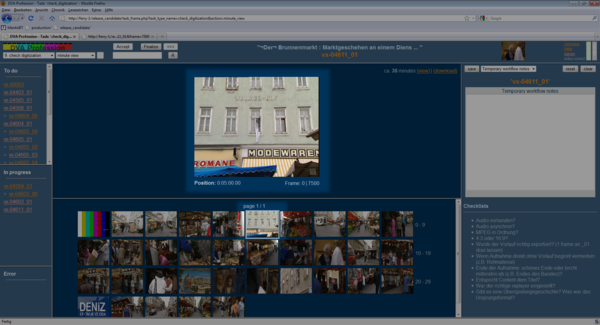
Minute view
In the action "minute view" you will see the thumbnails that were created in the task "generate thumbnails" (1). These are built of the first frame of each minute segment. At the top center of the screen there is a larger view of the currently selected image (2).
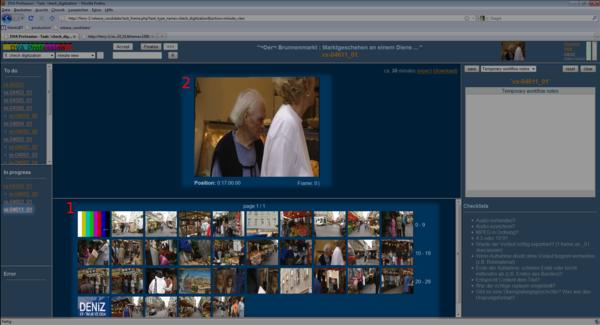
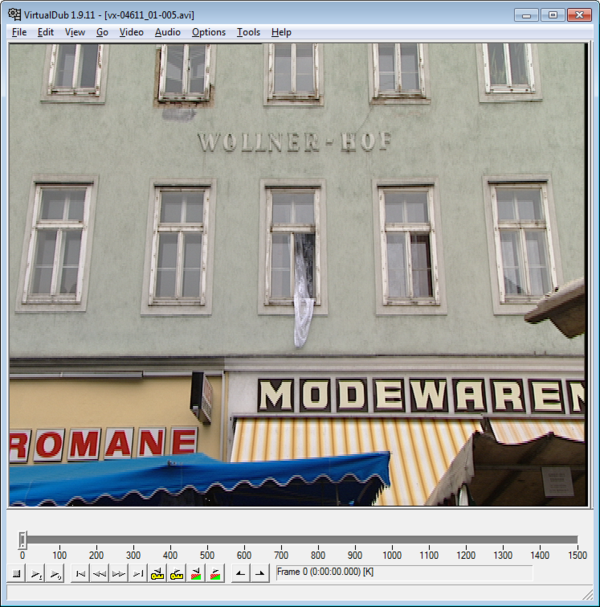
Click on one of the small pictures. The one you chose is displayed on the large view which is linked to its corresponding video file. Usually, this will be a 1-minute video segment.
Click on it and the selected segment will open in the application you have configured your browser to open this kind of video with (e.g VirtualDub).
The main feature of the minute view is that the operator can get an overview of the content of the whole video. Each thumbnail (small) represents one minute of the video and shows the first frame of the segment. This way you can quickly get information about the length of the video. The minute view is very useful for checking if the export of the captured video has correctly been performed. It is important to control if the content of the exported video is corresponding to the title. This is because in the task "capture export" it may happen that the operator does select the wrong destination folder by mistake and therefore the wrong content is assigned to the wrong signature. This is a failure that cannot be excluded to happen and therefore must be an issue of control.
Important to check is also if the audio of the video is existent.
This is done by replaying minute segments. Another important issue is to control if the audio and video are in sync. This also done by replaying minute segments. Keep in mind that the minute segments that you can replay in the minute view are the archive copy of the digitized video. So this is a direct way to check to quality of the archive copy itself.
In the action "minute view" you also have access to the viewing copy (MPEG-2). On the right top corner of the screen you will find the link "View". Click on it and the video file will open up. It is important to check if the file has been correctly encoded. Replay it to check (e.g. in VLC Player).
Another option that can be very useful is the download of the MPEG file. If you need to further process the MPEG file (e.g. burning it to a DVD) you can easily download it by clicking on the "download" link in the upper right corner of the screen.

Scene cuts
In the action "scene cuts" you see thumbnails displayed that were created in the task "scene cut detection" (using the software "Shotdetect"). Each thumbnail shows the first frame after a detected scene cut.
Similar to the minute view this feature gives the operator an overview of the digitized video. Depending on the content the seperate scenes can offer a more accurate overview of the video.
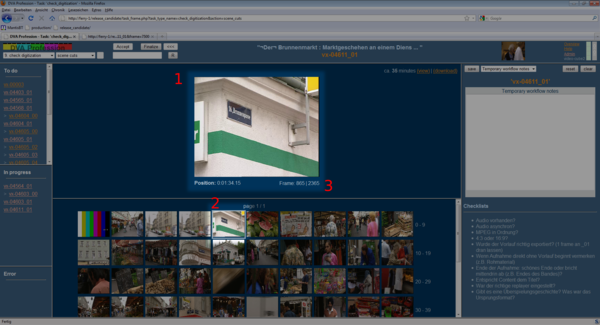
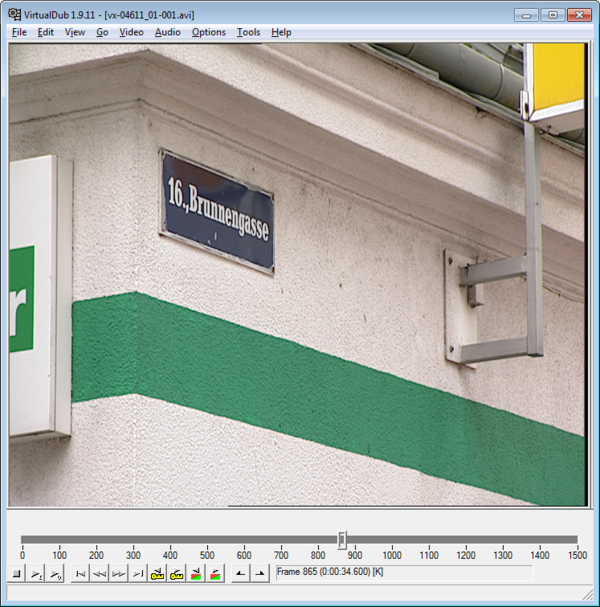
By clicking on one of the small thumbnails (2) you can select it. It will be displayed in the large view (1) on the top center of the screen. Beneath the large view you find the time specification of the position of the selected frame in the video(3). Next to it the number of the selected frame is indicated (Frame: number of frame within the minute segment | total frame number). In order to take a close look at one scene cut remember the number of the frame within the minute segment.
Now click on the large view and the minute segment in which the selected scene cut happened opens up.
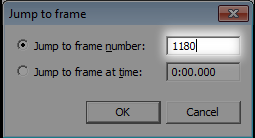
Go to the frame number of the scene cut (in VirtualDub press "strg"+"G" or click on "Go" - "Go to frame" and type in the frame number).
The scene cut detection is one of the core features of the task "check digitization". The reason for that is that strong and abrupt changes in the video will be recognized as "scene cuts". This means that it is not only real scene cuts that are detected by this feature: it does detect aberrations of the video.
For example when capturing a video tape and because of a defect of the tape the signal does suddenly break off it will be detected and the thumbnail of the first frame where this problem appeared will be displayed (Experience showed that the hit rate for problems with digibeta is extremely high, while for analogue formats it is usefull as an indicator of problems with the video but it will not recognize the majority of issues - for those formats the "analysis graph" offers great accuracy in the detection of problems).
A/V metadata
The action "av metadata" is a vital part of the check of the video file although it will only take you a quick look. It is important to control if the duration of audio and video are matching each other. Take a look at the codec of audio and video. Other metadata displayed for video are: format, framerate and resolution. For audio you get resolution and channels.
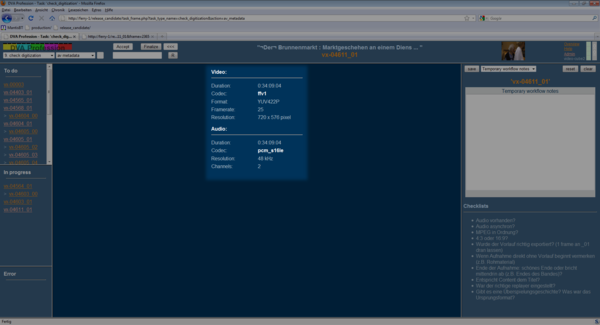
Here is a A/V metadata example of a standard SD PAL video, captured with lossless codec FFV1 for video and PCM 16bit for audio:
Video:
- Codec: FFV1
- Format: YUV422P
- Framerate: 25 fps
- Resolution: 720 x 576 pixel
Audio:
- Codec: pcm_s16le (=PCM 16bit signed, little endian)
- Resolution: 48 kHz
- Channels: 2
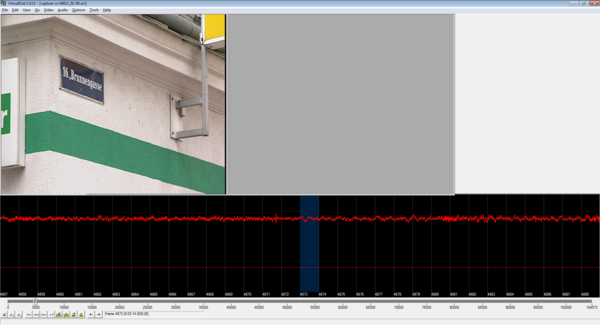
Analysis graphs
The "analysis graph" offers the operator an opportunity to detect problems of the captured video tape with incredibly high accuracy: all kinds of video artefacts can be detected, ranging from small things like dropouts to the complete break off of a video signal. This demands the operator to engage himself/herself in detail with the analysis graph, to study its "language" and to develop a feeling for those graphs.
The analysis graph currently consists of two related graphs:
1) The black & white graph on top represents changes between two frames, usually indicating the quantity of visual movement.
2) The graph beneath shows the RGB component values within the video in their corresponding colors (red, green and blue).
Each horizontal pixel represents exactly one frame and scrolling of the two graphs is synchronized. On the bottom there is the corresponding time information displayed (each mark stands for one second).
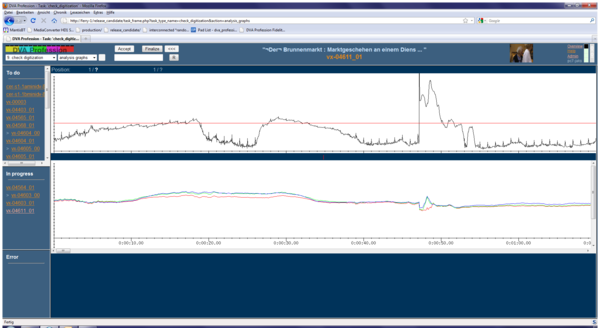
Move your mouse over the analysis graph and you will find that the position information on top will change according to your movement.
Now click on the graph. The left number of the position information will tell you the number of the frame that you have clicked on within a minute segment and the right number will tell you the absolute frame number within the whole video. The number of the frame that you clicked on will freeze.
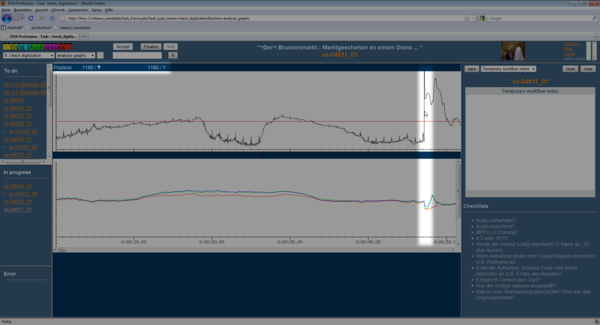
By clicking on the graph the video file in which the selected frame is contained will open.

Remember the frame number displayed in the position information and go to that frame (in VirtualDub press "Strg" - "G" or click "Go" - "Go to frame"). This way you can easily jump from the analysis graph directly to the minute segment (which is the archive copy itself). If you meet a conspicuous change in the graph click on the graph and the respective minute segment opens. Go to the desired frame and have a look at it.
If you move to the next frame now (press right arrow key), you will see that this is actually a scene cut:
Problems of the captured video do not necessarily show exactly the same behavior in the analysis graph. Their appearance depends highly on the content of the video. If you have a recording of an interview with a person with no scene cuts and always the same camera angle the analysis graph will be very constant with rare changes to it. If there are dropouts in that video they will be rather easy to spot because they will show up as slight changes in the graph.
If you have a video with a lot of visual movement going on, it will be extremely hard to find dropouts because there are so many changes in the graph that such slight changes like dropouts will simply be masked by the rest. But more severe problems will still be easy to spot if there is a lot of action going on in the video (e.g. if the video signal breaks off).
Workflow process
The action "workflow process" is designed for monitoring purposes. All the tasks that a signature has undergone are put on record with the according metadata and the operator can monitor and verify the correctness of the workflow processing in the action "workflow process". This action is the only one that is available in all tasks and the data it displays grows during the ongoing processing of a signature by every task that it has touched.
4.2.10 Task 10: finalize metadata
The task "finalize metadata" is an automated task. This task is designed as the final step for merging all metadata collected during the whole worklow together in one final container. This includes data such as: physical carrier information, audio/video metadata, the workflow process documentation as coding history - and many more. Since true interoperability and long-term sustainability always requires the use of open standards, DVA-Profession uses the "Metadata Encoding and Transmission Standard" (METS), designed and used by the U.S. Library of Congress (http://www.loc.gov/standards/mets/). All metadata which is finally written into a single XML file, is therefore stored in well-documented, standardized and content-related formats (PMD, VMD, AMD), wrapped in a METS container.
4.2.11 Task 11: move to archive
The task "move to archive" is an automated task. This task is the actual step which copies all files that are actually to be stored in the long-term archive, into their designated final destination on the digital mass-storage. This step also takes care of renaming files in a customizable way to fit any local naming conventions. Although the system is clever enough not to try to move files to the archive if there's not enough space, it is still a good idea to avoid any problems during this task by keeping an eye on the "Disk space monitoring" to check if the archive's storage is accessible and that there is enough disk space left. This should be done at the last manual task which is "check digitization" before finalizing a signature.
4.2.12 Task 12: clean up
The task "clean up" is an automated task. This task is designed to delete all the files of a given signature from the workstation. After all data has successfully been transferred to the archive's storage there is no need to keep it within the DVA-Profession system anymore. On the contrary it is important to delete all the files on the workstation in order to make sure that there is enough disk space left for the processing of upcoming videos.
NOTE: It can happen that a signature that has been accepted on one workstation in the task "video capture" needs to be reset and accepted again in this task on another workstation. In this case "clean up" is only aware of the files that were created on the latter workstation and able to delete them. The files that were created on any previous workstation have to be deleted manually.