DVA-Profession used at the Austrian Mediathek
The concepts
File-based solution
Following the concept to introduce the simplest viable solution, we decided not to use any database. Instead, all the needed information and created data are simply stored as files in an organized system of folders. For example, the metadata describing the workflow is an XML file enriched with additional information by every successive task in the row. This file gets passed from task to task. The Ids, you see in the frames of the HTML page (GUI), are actually the names of listed XML files situated in the dedicated folders. Thus, at every stage it is possible to check the actual status of each recording.
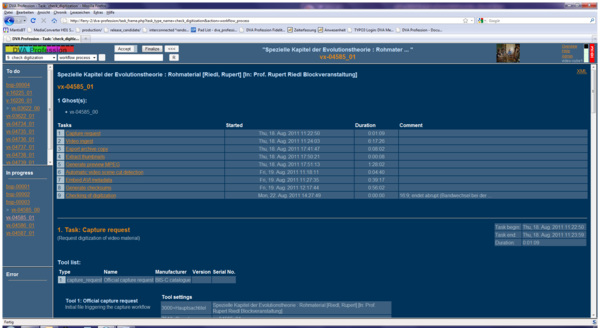
Figure 1: This view gives reference of the performed tasks, their parameters and their individual periods.
Architecture
The other simplification is represented by the fact that each of the ingest machines is dealing with just one task at a time, although they technically would be able to perform more than just one process. Thus, keeping track of which task is performed by which machine can be achieved with less complex scripting. This concept increases the number of PCs in use. But since the captured files are temporarily stored on the respective ingest client until the complete workflow is finished and the file is moved on to the archive storage, the available data space increases with each PC added to the system, which makes any need of extra storage obsolete.
Codec
At the Austrian Mediathek we made the decision for FFV1 (http://en.wikipedia.org/wiki/FFV1) because it satisfies our most important requirements described in the former chapter:
- lossless
- readable independently of proprietary systems/software and used by widespread and accessable applications
- data compression
With middle range standard hardware the FFV1 codec can be performed in realtime. The SD signal can be captured natively in the desired archive format. Thus, we avoid the time and resources necessary for conversion into the archive format. VirtualDub also gives us the ability to segment the files in accurate length. There already exists a version of FFV1 which can be performed with multithreading. This accelerates the performance speed. We didn't find time yet to test whether this will enable realtime capturing of HD. We mainly focussed in our testing on SD because it represents the lion's share of the content of our video archive.
If other, more reliable codecs become available or the JPEG 2000 codec fulfills the same requirements, the FFV1 codec would enable us to migrate to these newer codecs at any time and without loss. Using FFV1 allows us to start video digitization now without compromising our requirements.
Segmented archive file
Our system is designed to accept each recording as a bundle of segmented files. We decided to split the video into 1-minute file segments. Using the PAL system in Europe, this translates to accurate 1500 frames per file. The main reason for dealing with segmented files lies in the attempt to reduce the load of the intranet and the storage environment and achieve a more fault-tolerant procedure. In case of failures during the moving of files through the network, having smaller files reduces the amount of data that has to be moved again.
Metadata
During the workflow the system requires information about the actual settings of all used hard- and software. This information can be provided by manually written files or - when implemented - by a script reading the configuration. This depends on the possibility to retrieve current configurations as metadata from the used tools. We focussed on the converter's information, because this seems to be essential for archival interests. The workflow of course is also well documented.
All Metadata are written in an XML file, which is defined using the METS (http://www.loc.gov/standards/mets/) schemas. Achieving this was one of the most time consuming efforts. It is one of our ideas to register our system with the official METS page at a later date. Following the METS standards enables many other institutions that have also implemented METS schemas in their systems, to interpret our metadata without complicated matching procedures and vice versa.
Quality check
During the act of digitization the quality check is one of the most important steps of the workflow. Tools help to identify critical parts of the ingest. But the decision whether the file should be accepted for the archive as the potential new (digital) original can't seriously be made by any software. Therefore we use only tools that help to illustrate the actual condition of the ingest, but do not distinguish between an event and a defect. To make this decision, is task of an operator.
So far we use:
- The stills of every first frames of each minute file to get an overview of the content (length, average picture quality).
- The stills of each detected change in the video (scene detection): This does not only show the edits. Many defects are detected and handled like edits and effect a still shown in this list.
- Not deinterlaced stills and viewing copy. Wrong field orders often show up on the stills.
- A viewing copy (MPEG-2) which is deliberately performed out of the already treated archive file without "improvements" (cropping deinterlacing, filtering)
- The graphics (color change, movement change) created by the application performing the scene detection: Synchronizing both graphics in one frame of the GUI and with each minute file enables the user not only to compare the graphics and such identify known symptoms. Clicking on the desired part of the graphic forces the player to open the dedicated archive file to get a close watch of the eventual problem at the archive copy.
The Workflow
For descriptive metadata we use an independent catalogue database. The workflow starts after the cataloguing. An automated export stores a text file with dedicated metadata selected from the record in the catalogue into a specified folder. A script continually looks for text files in this location and eventually parses them. When such a text file has been acknowledged and parsed, the ID of the recording to be digitized appears in the “to do” frame of the first task called „request“. This ID actually is the filename of the text file, which then becomes modified with additional information from task to task. In the first task called “request video capture”, there is a small text box where some technical information about the physical carrier has to be entered, which might be important for later research. The fields to be filled in vary with the format and its specifications. (Fig. 2) After successful digitization, the next tasks start automatically. The recording is analysed, thumbnails get created, metadata get collected and a viewing copy (MPEG-2) is made. This takes some time so the manual check has to wait until the next day. Fortunately we can continue for the day with digitizing additional recordings...
Different views are available for checking to see whether the digitized recording was a success or should be redone for any reason. (Fig. 2 and Fig. 3)
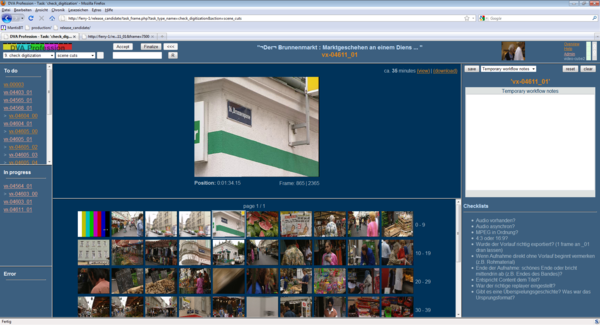
Figure 2: This is the view of the detected shots.
It shows some results of the detected cuts and transitions. The larger picture on the top represents the activated thumbnail below. In addition, the application also detects many extant picture errors, interprets them as cuts and creates thumbnails, as it does with all normally detected cuts. Thus, many failures become visible at a glance.
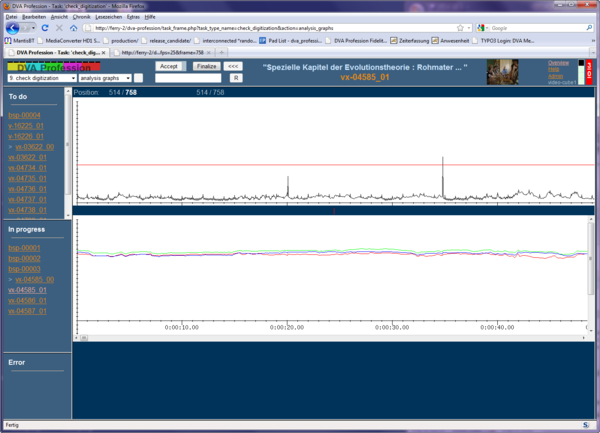
Figure 3: Analysis graphs for quality control.
These two graphics in the browser are created by the shot-detect application during the analysis. We combined and synchronized them in the browser. Slewing through these traces gives us much information about the condition of the file. Parts in doubt can be viewed in a video player by clicking onto the curve.
Programming language
The code is written in PHP.
In order to have only one programming language across the whole project and because of its ease-to-learn and widespreadness, PHP was chosen for implementing the browser-based GUI and the workflow processing applications running in the background. The GUI therefore is a standard browser. We optimized it for Mozilla Firefox. Using another browser shouldn't be a problem. But it was not tested by us.
The program is written as a number of scripts which are executable and themselves represent the source code.
Publishing the system as Open Source software
The scripts, documentation and descriptions are published under the GNU General Public License (GPL). Our intention is to return code, which we used for free from the internet, enriched with our input. We took some individual applications and are giving back an entire system. All applications, which we had to modify, did not just become an orphaned version for our own use. Depending on the development structures of external tools, we're not only sending our changes back to the upstream developers, but also collaborate with some of them, as well as directly commit into the official source tree. In another case we were successful in getting the developers to take our needs into account during their future development.
The components
Hard- and Software
| Video-Cube (ingest machine): | Ferry (automation server): |
|---|---|
| Standard PCs, Dual-Core (2.3 GHz, Intel I5), Decklink SDI card | Standard PCs, Dual Core (2.6 GHz, Intel I5) |
| Windows 7 | Debian Squeeze (6.0.2) |
| ffdshow-tryout (codecs) | Encoding: mencoder, mplayer, imagemagick, ffmpeg |
| VirtualDub (Open Source capture software) | Video analysis: Shotdetect |
| Language: PHP |
Besides the Decklink card we used only standard hardware. At the moment we have in use four machines for capturing the video and two ferries, which perform all automated tasks in the background.
Both sides, number of ingest clients as well as ferries, can be altered by additional machines.
Capture/Player
For the ingest of SDI video streams, we use the application called „VirtualDub“. It runs on MS Windows. Having the ffmpeg library installed, it enables the application to capture natively with the FFV1 codec wrapped in an AVI container. VirtualDub also gives us the ability to segment the files in accurate length.
GUI
The GUI, which shows all tasks, statuses and actions, is a plain web page. In order to support as many browsers as possible, the HTML code was kept straight-forward using only well-known and established HTML elements. The use of Javascript was kept to a minimum and is not required for vitally necessary functions of the GUI. Watching and navigation of the complete workflow is organized in this one page. It is designed to make only those items available, which are needed at the actual state of the workflow. The page is divided into 5 frames. (Fig. 4)
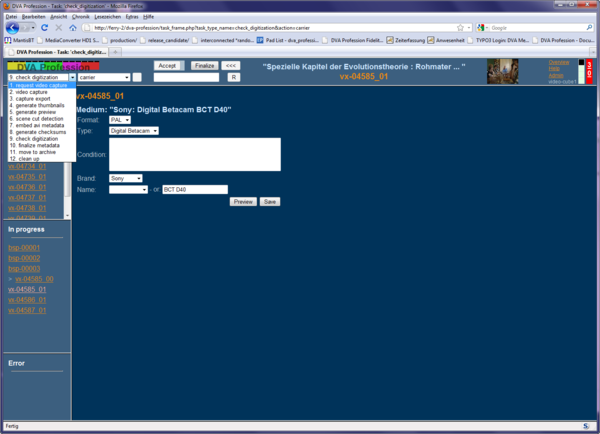
Figure 4: This dropdown shows the actual installed tasks.
When a task is selected, the frame changes to a view of the dedicated task. The upper frame of the window shows the navigation menus and action buttons for accessing, finalizing and eventually resetting tasks. Buttons are only active when the tasks are in the appropriate context. The left menu shows all installed tasks, which can be chosen by clicking. The content of all frames then relies on this dedicated task. The second menu offers a selection of different actions depending whether they are available in the chosen task.
The left column is divided into 3 parts, representing the status of an item:
- to do
- in progress
- error
Status "to do":
The textfiles of all recordings ready for the actual task, are waiting inside the frame called “to do” until they are accepted.
Status "in progress":
When accepted for processing, the respective textfile is moved into the frame called “in progress”. Then the dedicated task starts.
When finished, the button “finalize” starts the finalizing procedure. All relevant files created in this task get moved into the task folder „finalized” and the textfile moves in to the “to do” folder of the next task. Depending on the character of the task, “accepting” or “finalizing” happen automatically or are manually initiated.
Status "error“:
Any errors that occur during the processing move the file to the “error” folder. In this case it is enriched with the appropriate error message. It appears in the frame called “error”. It will stay there until it is manually reset. It then jumps back to “to do”, where it waits until being accepted again.
In fact, the visible recordings are nothing else than the names of metafiles in dedicated folders. This means the information illustrated on the page is generated by simply summarizing the content of the dedicated folders “to do”, “in progress” and “error”. These metafiles start with the metadata deriving from the catalogue and become modified with additional processing information from task to task. After a task is finished and the button “finalize” has been activated, this file will move on to the next task.
The middle frame shows the content of the files, which has been created during former tasks of the selected recording. It varies with the selected action. An overview shows all existing recordings and their individual status. There, they can also be processed as a batch. (Fig. 5).
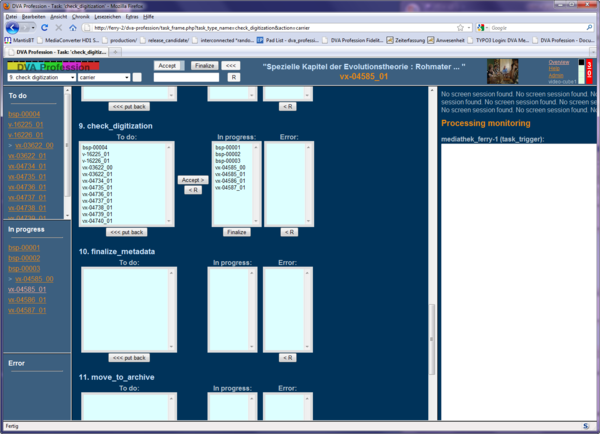
Figure 5: This overview enables monitoring and administrating the tasks in common.